Wednesday, February 15, 2012

New items!

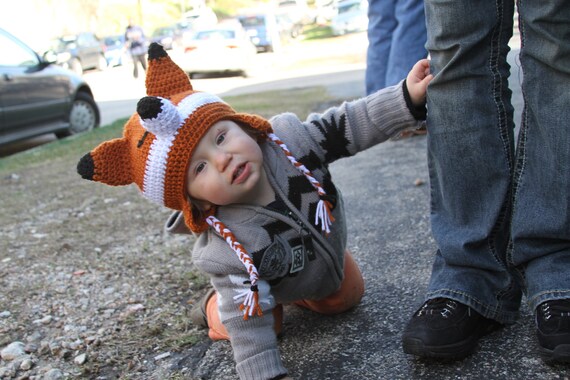
Adorable Orion wearing his fox hat and using me to stand up, haha
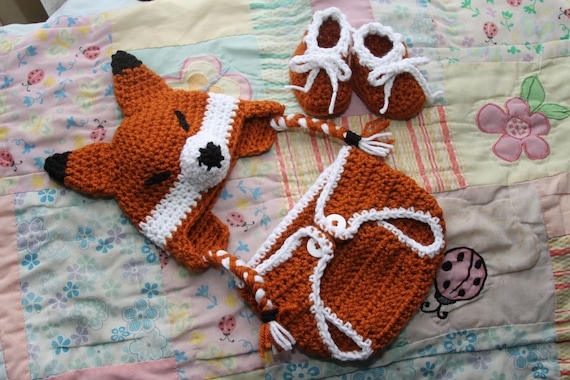
Fox baby set - Hat, Diaper Cover and Booties
Added something new to my stores! Anyone familiar with my creations knows about the Fox hats, but now I have made it a set, complete with matching diaper cover and booties. You can find it in my etsy store, my WePay store, or my eBay store (that nearly rhymes!). If you purchase from eBay, 10% of the purchase price goes to the wonderful charity, A Dog's Life Animal Rescue.

I'm also working on matching sets for some of my other hats. :)

Tuesday, January 31, 2012

I've finally done it...

I cracked open the bottle of Mod Podge I bought nearly 4 months ago (Joann didn't have what I wanted and I had a 50% off coupon, so I bought some without a need!). As I feared hoped, I am now a definite fan. Which is pretty dangerous, actually! I keep trying to think of things to use it on!

Fortunately, I have a few projects that should help satisfy the urge. A friend of mine is expecting and I'm helping to plan her baby shower at the end of March. The Mod Podge possibilities are practically endless! I already have an activity of baby block decorating set to go and did a small trial run last week. To say it was easy and the end result awesome would be, IMO, an understatement! I will post photos once I've taken some, but here are the supplies for the baby blocks that I've gathered:
* 2" wooden Cubes from https://www.caseyswood.com/ (many other sizes available - I got 60 2" for under $50 shipped)
* Mod Podge matte
* Mod Podge outdoor (just ordered this... I'm thinking a water-resistant seal would be best)
* Printed clipart cut into 2" squares (animals, dragons, letters)
* Colored paper and scrapbook paper
* Sharpies and colored pencils for that extra personal touch
* 1" foam brushes

Oh, and I got a sizable wooden treasure chest that I want to decorate as the 'box' for the blocks (and anything else they want to put in there!). Just picked that up from Joann yesterday for about $20 with a 40% off coupon. I'm super excited about doing things for the shower (feel free to follow my Pinterest board) and for my friends (also have a pinterest board inspired by them - gender-neutral dragon things for kids/babies). They aren't finding out the sex until the baby is born, so they came up with what I think is a fantastic gender-neutral nursery theme - dragons. The great thing about dragons is that they can be any color and range from super-cute to bordering-on-scary.

I'm talking to the bakery/baker who made my wedding cake nearly 3 years ago about making the cake. Cris at A Gift of Taste is just great to work with and she never shies away from doing something 'different'. She didn't bat an eye when we said we wanted star-shaped wedding cakes (unlike nearly everyone else!), nor did she charge us anything but a fair price. When I mentioned the shower theme, she likewise didn't seem to think I was crazy. I realize this isn't craft or DIY related, but I honestly can't recommend this bakery to those in the 805/Los Angeles area! Her flavor selections are mouth-watering and the quality and taste are not disappointing. We froze our top tier and ate it a year later and it was STILL OMG good!

Anyway, I am also starting to venture more into the realm of sewing (yeah, I know, Eek!). I have a nice sewing machine and tons of thread... And a lot of sewing isn't necessarily that hard! I made myself a hair turban yesterday in about 5 minutes using some cotton almost-terry cloth fabric from Joann and a button. See, my hair goes a few inches past my butt. That makes my current hair turbans annoyingly short. For $5, I made one that was the right size! Plus, I got to pick the color. :)

Fear not, fiber fans! I am not leaving the world of crochet! I'm still fulfilling orders in my etsy and ebay shops, as well as on consignment in Austin, TX's oh-so-awesome The Wondercraft boutique. I just finished a hoodie for my nephew using Hobby Lobby's Sweet Baby Delights bulky 'eyelash' yarn (why do we not have Hobby Lobbys here?!), as well as an afghan for a friend's baby.

I have, as always, so many things I want to do!

Wednesday, January 25, 2012

Upcycled Plastic Pom-Pom Wreath

To say that I was kept busy this holiday season would have been an understatement! haha, Pretty constant orders from Thanksgiving and on, plus the gifts that I wanted to make gave me little spare time for blogging.
Upcycled Plastic Bag Pom-Pom Wreath


I just barely finished my upcycled shopping bag wreath in time for the holidays, though I didn't get to put it up where I'd originally intended. Oh well, the beauty of what it's made of is that it should last for quite awhile! For this, I used:
* A wire wreath frame I bought from Joann as the base
*Some cotton twine I got from someone on Freecycle (score!)
*Scissors
*A rotary cutter
*A self-healing mat
*Plastic shopping bags (plus some other plastic bags)

First, I needed to make "plarn" (plastic yarn). In order to be both frugal and at least sort of eco-friendly, I used only plastic bags that I had around (or that I could get from friends or relatives that had them lying around) and didn't "cheat" by asking for extra bags or snagging some from a store OR buying them. You'll notice a few non-shopping bag pom poms in my wreath... I had to make over 60 pom-poms to fill this rather sizable wreath and just don't get that many when I shop! There's a "bag" from when I ordered boxes from USPS in there and a few bread bags. Many of the bags I used were from craft stores (Joann & Michael's especially), as well as Target and Walmart.

If you're not familiar with making things like bags and t-shirts into long, continuous "strings", here's a short tutorial (with bags and a rotary trimmer, though I'm sure you can figure out the shirt way and/or the scissors way as well):
1: Lay the bag flat (if there is a logo on the bag, you want that side up or side down).
2: Cut off the bottom and top/handles of the bag so you're left with a rectangular tube.
3: Slice bag from side to side, leaving about 1" on one side uncut (makes it look a bit like a fork or comb)
4: Open the now-sliced bag and work with the 2" connected part, cutting diagonally from one previous cut to the next.
5: You have plarn! (or tarn, if it's a t-shirt)

From there, make pom-poms with the pom-pom maker (seriously, these things are a godsend!! I didn't realize what I was missing until I broke down and bought one!). I used the Clover one, size Large. One regular-sized shopping bag made about one pom-pom, while the large bags (popular around the holidays) made about three pom-poms. Be sure you leave a long tail when you are tying the pom-pom.

Tie pom-poms randomly to your wreath frame.

You COULD do this with a styrofoam wreath, but I preferred the freedom and precision that the wire one allowed me (plus, it was cheaper! $3 at Joann... or $1.50ish with a coupon). Another plus? I could put Christmas lights through the back for a bit of extra pizzazz.

I imagine this could also work for other seasons (for fall, the brown bags you find in a lot of grocery stores could work well!). It could also be decorated with silk flowers, ribbons, bows...