Hello world!
Been awhile! Since my post a few millennia, I've started homeschooling my oldest and have had another kiddo! :)
Now that my youngest is almost a year old, I think I might be able to get back into blogging, both here and on my book review blog, Musings of Madjy. I want to document some of the fun things that we are doing, and share some ideas (I welcome any and all suggestions as well!).
For those wondering, we're eclectic homeschoolers, which means that basically anything goes. We lean towards unschooling, but we take bits of whatever we like and use that as "school work." Life is learning, after all!
It may take a little while before I start regularly posting in here, as I prepare projects for the upcoming holiday season. I am also in the midst of birthday season here at the Bilodeau house, with every other human in my household having a birthday in a 30-day span (my youngest is October 9th, then husband is October 19th, then oldest is November 8th!), and I have some fun themes planned for my boys' parties. I'll try to share some of that here, as well!

I am a homeschool mom to a kingergartener & toddler, and love all things crafty and creative! Come into my crazy world and see the crochet, origami, baking, cooking, sewing, and other craziness that I come up with & encounter. :)
Friday, September 28, 2018


Monday, April 16, 2012
Beth's Baby Shower
I've been quiet for so long!
Since my last post, I have co-hosted my friend's Dragon-themed baby shower and found out that I'm expecting! I'm due on November 7th. :)
I was just finishing up post-processing the shower photos and thought I'd share some of what was done for it!

1. The invitations! I designed these in Illustrator, printed them out on cardstock, attached some ribbons and put them in hand-cut "diapers". The diapers are green paper with "legs" cut out and then glued closed and decorated with buttons. You can't see in the photo, but the second page of the invitation has the registry information as well as a request that children's books be given instead of greeting cards and there is a label to put in your book. Which leads up to...
2. These are some of the labels I made (nearly each one was different) for people to put in the books they wanted to give.
3. These are all one of my co-host's, Kaylene, doing. Gorgeous roses and cute little birdcages with egg candles in them.
4. This was our dessert table (sans strawberry shortcake). Those are mint chip covered oreo truffle pops and various truffles around the cake. The cake itself is a Costco cake with a dragon I sculpted out of Crayola Air-Dry clay and that my husband painted for me.
5. The wonderful mommy-to-be! She's wearing a sash and a crochet flower crown that I made (the crown, not the sash!). I thought it would be fun to make her wear something extra-special, hehe. Inspiration for it was actually the movie "The Switch", since Jennifer Aniston wears a flower crown at her "Insemination Party".
6. Design a baby block activity. I bought a bunch of 2" wooden blocks from Caseyswood.com, several packs of colorful Sharpies from Costco, 1" foam brushes from a variety of places (<5 cents each), printed out hundreds of clip-art images of animals and dragons and letters, and filled empty baby food jars I got off Freecycle with Mod Podge matte. I will be sanding down the corners and sealing them with baby-friendly Shellac.
7. Our book table. I take no credit for the decorations! Those were all Kaylene. :) I was, however, the one who found the great idea to bring books! Both of the parents-to-be LOVED this idea and I intend to suggest it when my own shower comes around. :)
8. Dessert. The oreo pops and truffles were also enjoyed, but the homemade Strawberry Shortcake was the real star. The daddy-to-be makes this for mommy-to-be every year for her birthday and really wanted to make it for her shower. Sweet, right? He even makes the whipped cream from scratch! It was seriously delicious!
1. The invitations! I designed these in Illustrator, printed them out on cardstock, attached some ribbons and put them in hand-cut "diapers". The diapers are green paper with "legs" cut out and then glued closed and decorated with buttons. You can't see in the photo, but the second page of the invitation has the registry information as well as a request that children's books be given instead of greeting cards and there is a label to put in your book. Which leads up to...
2. These are some of the labels I made (nearly each one was different) for people to put in the books they wanted to give.
3. These are all one of my co-host's, Kaylene, doing. Gorgeous roses and cute little birdcages with egg candles in them.
4. This was our dessert table (sans strawberry shortcake). Those are mint chip covered oreo truffle pops and various truffles around the cake. The cake itself is a Costco cake with a dragon I sculpted out of Crayola Air-Dry clay and that my husband painted for me.
5. The wonderful mommy-to-be! She's wearing a sash and a crochet flower crown that I made (the crown, not the sash!). I thought it would be fun to make her wear something extra-special, hehe. Inspiration for it was actually the movie "The Switch", since Jennifer Aniston wears a flower crown at her "Insemination Party".
6. Design a baby block activity. I bought a bunch of 2" wooden blocks from Caseyswood.com, several packs of colorful Sharpies from Costco, 1" foam brushes from a variety of places (<5 cents each), printed out hundreds of clip-art images of animals and dragons and letters, and filled empty baby food jars I got off Freecycle with Mod Podge matte. I will be sanding down the corners and sealing them with baby-friendly Shellac.
7. Our book table. I take no credit for the decorations! Those were all Kaylene. :) I was, however, the one who found the great idea to bring books! Both of the parents-to-be LOVED this idea and I intend to suggest it when my own shower comes around. :)
8. Dessert. The oreo pops and truffles were also enjoyed, but the homemade Strawberry Shortcake was the real star. The daddy-to-be makes this for mommy-to-be every year for her birthday and really wanted to make it for her shower. Sweet, right? He even makes the whipped cream from scratch! It was seriously delicious!
Wednesday, February 15, 2012
New items!
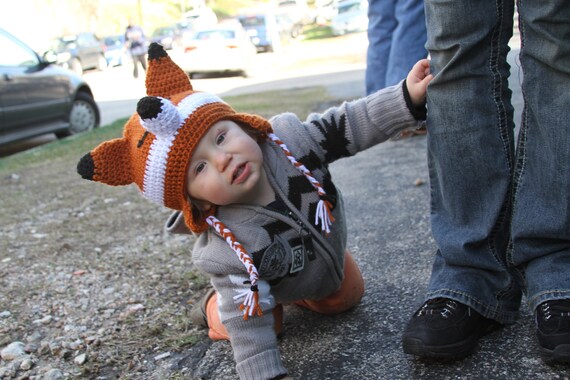 |
| Adorable Orion wearing his fox hat and using me to stand up, haha |
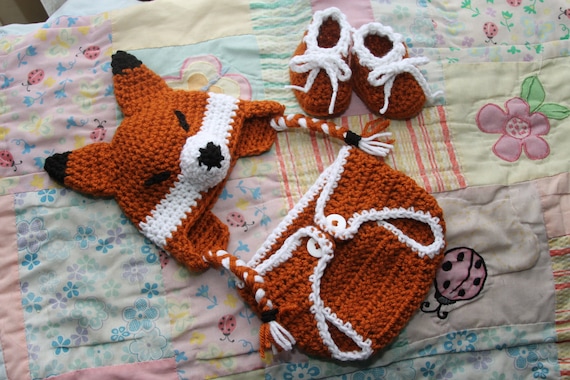 |
| Fox baby set - Hat, Diaper Cover and Booties |
I'm also working on matching sets for some of my other hats. :)
Tuesday, January 31, 2012
I've finally done it...
I cracked open the bottle of Mod Podge I bought nearly 4 months ago (Joann didn't have what I wanted and I had a 50% off coupon, so I bought some without a need!). As I feared hoped, I am now a definite fan. Which is pretty dangerous, actually! I keep trying to think of things to use it on!

Fortunately, I have a few projects that should help satisfy the urge. A friend of mine is expecting and I'm helping to plan her baby shower at the end of March. The Mod Podge possibilities are practically endless! I already have an activity of baby block decorating set to go and did a small trial run last week. To say it was easy and the end result awesome would be, IMO, an understatement! I will post photos once I've taken some, but here are the supplies for the baby blocks that I've gathered:

Fortunately, I have a few projects that should help satisfy the urge. A friend of mine is expecting and I'm helping to plan her baby shower at the end of March. The Mod Podge possibilities are practically endless! I already have an activity of baby block decorating set to go and did a small trial run last week. To say it was easy and the end result awesome would be, IMO, an understatement! I will post photos once I've taken some, but here are the supplies for the baby blocks that I've gathered:
* 2" wooden Cubes from https://www.caseyswood.com/ (many other sizes available - I got 60 2" for under $50 shipped)
* Mod Podge matte
* Mod Podge matte
* Mod Podge outdoor (just ordered this... I'm thinking a water-resistant seal would be best)
* Printed clipart cut into 2" squares (animals, dragons, letters)
* Colored paper and scrapbook paper
* Sharpies and colored pencils for that extra personal touch
* 1" foam brushes
Oh, and I got a sizable wooden treasure chest that I want to decorate as the 'box' for the blocks (and anything else they want to put in there!). Just picked that up from Joann yesterday for about $20 with a 40% off coupon. I'm super excited about doing things for the shower (feel free to follow my Pinterest board) and for my friends (also have a pinterest board inspired by them - gender-neutral dragon things for kids/babies). They aren't finding out the sex until the baby is born, so they came up with what I think is a fantastic gender-neutral nursery theme - dragons. The great thing about dragons is that they can be any color and range from super-cute to bordering-on-scary.
I'm talking to the bakery/baker who made my wedding cake nearly 3 years ago about making the cake. Cris at A Gift of Taste is just great to work with and she never shies away from doing something 'different'. She didn't bat an eye when we said we wanted star-shaped wedding cakes (unlike nearly everyone else!), nor did she charge us anything but a fair price. When I mentioned the shower theme, she likewise didn't seem to think I was crazy. I realize this isn't craft or DIY related, but I honestly can't recommend this bakery to those in the 805/Los Angeles area! Her flavor selections are mouth-watering and the quality and taste are not disappointing. We froze our top tier and ate it a year later and it was STILL OMG good!
Anyway, I am also starting to venture more into the realm of sewing (yeah, I know, Eek!). I have a nice sewing machine and tons of thread... And a lot of sewing isn't necessarily that hard! I made myself a hair turban yesterday in about 5 minutes using some cotton almost-terry cloth fabric from Joann and a button. See, my hair goes a few inches past my butt. That makes my current hair turbans annoyingly short. For $5, I made one that was the right size! Plus, I got to pick the color. :)
Fear not, fiber fans! I am not leaving the world of crochet! I'm still fulfilling orders in my etsy and ebay shops, as well as on consignment in Austin, TX's oh-so-awesome The Wondercraft boutique. I just finished a hoodie for my nephew using Hobby Lobby's Sweet Baby Delights bulky 'eyelash' yarn (why do we not have Hobby Lobbys here?!), as well as an afghan for a friend's baby.
I have, as always, so many things I want to do!
* Printed clipart cut into 2" squares (animals, dragons, letters)
* Colored paper and scrapbook paper
* Sharpies and colored pencils for that extra personal touch
* 1" foam brushes
Oh, and I got a sizable wooden treasure chest that I want to decorate as the 'box' for the blocks (and anything else they want to put in there!). Just picked that up from Joann yesterday for about $20 with a 40% off coupon. I'm super excited about doing things for the shower (feel free to follow my Pinterest board) and for my friends (also have a pinterest board inspired by them - gender-neutral dragon things for kids/babies). They aren't finding out the sex until the baby is born, so they came up with what I think is a fantastic gender-neutral nursery theme - dragons. The great thing about dragons is that they can be any color and range from super-cute to bordering-on-scary.
I'm talking to the bakery/baker who made my wedding cake nearly 3 years ago about making the cake. Cris at A Gift of Taste is just great to work with and she never shies away from doing something 'different'. She didn't bat an eye when we said we wanted star-shaped wedding cakes (unlike nearly everyone else!), nor did she charge us anything but a fair price. When I mentioned the shower theme, she likewise didn't seem to think I was crazy. I realize this isn't craft or DIY related, but I honestly can't recommend this bakery to those in the 805/Los Angeles area! Her flavor selections are mouth-watering and the quality and taste are not disappointing. We froze our top tier and ate it a year later and it was STILL OMG good!
Anyway, I am also starting to venture more into the realm of sewing (yeah, I know, Eek!). I have a nice sewing machine and tons of thread... And a lot of sewing isn't necessarily that hard! I made myself a hair turban yesterday in about 5 minutes using some cotton almost-terry cloth fabric from Joann and a button. See, my hair goes a few inches past my butt. That makes my current hair turbans annoyingly short. For $5, I made one that was the right size! Plus, I got to pick the color. :)
Fear not, fiber fans! I am not leaving the world of crochet! I'm still fulfilling orders in my etsy and ebay shops, as well as on consignment in Austin, TX's oh-so-awesome The Wondercraft boutique. I just finished a hoodie for my nephew using Hobby Lobby's Sweet Baby Delights bulky 'eyelash' yarn (why do we not have Hobby Lobbys here?!), as well as an afghan for a friend's baby.
I have, as always, so many things I want to do!
Wednesday, January 25, 2012
Upcycled Plastic Pom-Pom Wreath
To say that I was kept busy this holiday season would have been an understatement! haha, Pretty constant orders from Thanksgiving and on, plus the gifts that I wanted to make gave me little spare time for blogging.
I just barely finished my upcycled shopping bag wreath in time for the holidays, though I didn't get to put it up where I'd originally intended. Oh well, the beauty of what it's made of is that it should last for quite awhile! For this, I used:
 * A wire wreath frame I bought from Joann as the base
*Some cotton twine I got from someone on Freecycle (score!)
*Scissors
*A rotary cutter
*A self-healing mat
*Plastic shopping bags (plus some other plastic bags)
First, I needed to make "plarn" (plastic yarn). In order to be both frugal and at least sort of eco-friendly, I used only plastic bags that I had around (or that I could get from friends or relatives that had them lying around) and didn't "cheat" by asking for extra bags or snagging some from a store OR buying them. You'll notice a few non-shopping bag pom poms in my wreath... I had to make over 60 pom-poms to fill this rather sizable wreath and just don't get that many when I shop! There's a "bag" from when I ordered boxes from USPS in there and a few bread bags. Many of the bags I used were from craft stores (Joann & Michael's especially), as well as Target and Walmart.
 If you're not familiar with making things like bags and t-shirts into long, continuous "strings", here's a short tutorial (with bags and a rotary trimmer, though I'm sure you can figure out the shirt way and/or the scissors way as well):
1: Lay the bag flat (if there is a logo on the bag, you want that side up or side down).
2: Cut off the bottom and top/handles of the bag so you're left with a rectangular tube.
3: Slice bag from side to side, leaving about 1" on one side uncut (makes it look a bit like a fork or comb)
4: Open the now-sliced bag and work with the 2" connected part, cutting diagonally from one previous cut to the next.
5: You have plarn! (or tarn, if it's a t-shirt)
From there, make pom-poms with the pom-pom maker (seriously, these things are a godsend!! I didn't realize what I was missing until I broke down and bought one!). I used the Clover one, size Large. One regular-sized shopping bag made about one pom-pom, while the large bags (popular around the holidays) made about three pom-poms. Be sure you leave a long tail when you are tying the pom-pom.
Tie pom-poms randomly to your wreath frame.
You COULD do this with a styrofoam wreath, but I preferred the freedom and precision that the wire one allowed me (plus, it was cheaper! $3 at Joann... or $1.50ish with a coupon). Another plus? I could put Christmas lights through the back for a bit of extra pizzazz.
I imagine this could also work for other seasons (for fall, the brown bags you find in a lot of grocery stores could work well!). It could also be decorated with silk flowers, ribbons, bows...
 |
| Upcycled Plastic Bag Pom-Pom Wreath |
I just barely finished my upcycled shopping bag wreath in time for the holidays, though I didn't get to put it up where I'd originally intended. Oh well, the beauty of what it's made of is that it should last for quite awhile! For this, I used:
 * A wire wreath frame I bought from Joann as the base
*Some cotton twine I got from someone on Freecycle (score!)
*Scissors
*A rotary cutter
*A self-healing mat
*Plastic shopping bags (plus some other plastic bags)
First, I needed to make "plarn" (plastic yarn). In order to be both frugal and at least sort of eco-friendly, I used only plastic bags that I had around (or that I could get from friends or relatives that had them lying around) and didn't "cheat" by asking for extra bags or snagging some from a store OR buying them. You'll notice a few non-shopping bag pom poms in my wreath... I had to make over 60 pom-poms to fill this rather sizable wreath and just don't get that many when I shop! There's a "bag" from when I ordered boxes from USPS in there and a few bread bags. Many of the bags I used were from craft stores (Joann & Michael's especially), as well as Target and Walmart.

1: Lay the bag flat (if there is a logo on the bag, you want that side up or side down).
2: Cut off the bottom and top/handles of the bag so you're left with a rectangular tube.
3: Slice bag from side to side, leaving about 1" on one side uncut (makes it look a bit like a fork or comb)
4: Open the now-sliced bag and work with the 2" connected part, cutting diagonally from one previous cut to the next.
5: You have plarn! (or tarn, if it's a t-shirt)
From there, make pom-poms with the pom-pom maker (seriously, these things are a godsend!! I didn't realize what I was missing until I broke down and bought one!). I used the Clover one, size Large. One regular-sized shopping bag made about one pom-pom, while the large bags (popular around the holidays) made about three pom-poms. Be sure you leave a long tail when you are tying the pom-pom.
Tie pom-poms randomly to your wreath frame.
You COULD do this with a styrofoam wreath, but I preferred the freedom and precision that the wire one allowed me (plus, it was cheaper! $3 at Joann... or $1.50ish with a coupon). Another plus? I could put Christmas lights through the back for a bit of extra pizzazz.
I imagine this could also work for other seasons (for fall, the brown bags you find in a lot of grocery stores could work well!). It could also be decorated with silk flowers, ribbons, bows...
Wednesday, December 7, 2011
First, loving the buttons... I haven't even opened half of them yet (20lbs is a LOT of buttons!), and my cup already runneth over with awesome buttons.
However, this post is not another one about buttons. This post is about the recent evilness of Paypal.
The in case you don't know, Paypal recently tried to screw over 200 children and their families who have fallen on hard times and were, very generously, going to be given a bit of happiness from strangers this Christmas from the founder of Regretsy, April, and the forum members of Regretsy.com. You can read about the entire thing here. Something many of you likely don't know is that this isn't the first time Paypal has tried to f*ck with people trying to help others... After Hurricane Katrina devastated New Orleans, the forum members of SomethingAwful.com got together and accumulated over $30,000 to donate to the Red Cross. Paypal pulled a similar stunt of freezing the account and then gave the owner of the SA account no choice but to refund all of the money (though, fortunately, Paypal did not keep their fees that time). You can read a detailed story about THAT situation here.
Truth be told, I've been pretty irritated with Paypal myself for quite awhile now. I've considered it an unfortunately necessary evil largely due to the incestuous relationship between Paypal and their head honcho, eBay, as well as their very obvious 'deal' with Etsy (funny that Etsy doesn't offer the option to have a Google Checkout [now Google Wallet] payment or Amazon Payments or any of the other dozens of Paypal competitors).
Many, many people closed their Paypal accounts over the last couple of days because they had had enough of the evilness that is Paypal. Unfortunately, I can't be one of them if I want to continue to do business on the internet. Because people are weary of using checkout options they aren't familiar with, or because it takes more effort to pay other ways, or because they don't want to have to re-establish themselves with another online payment processor, I have to use Paypal.
And here we come to the more important part of my post: I hate how much power Paypal has and I want to do something, however small, to try to take some of that power away from them. There is a damn good reason anti-monopoly laws exist and Paypal is a good example of that reason.
So I am setting out to introduce more people to the other options they have available to them. I'm going to start offering various promotions over the next few months for those who use Google Wallet to make their Etsy payment. I encourage other Etsy sellers to do the same.
However, this post is not another one about buttons. This post is about the recent evilness of Paypal.
The in case you don't know, Paypal recently tried to screw over 200 children and their families who have fallen on hard times and were, very generously, going to be given a bit of happiness from strangers this Christmas from the founder of Regretsy, April, and the forum members of Regretsy.com. You can read about the entire thing here. Something many of you likely don't know is that this isn't the first time Paypal has tried to f*ck with people trying to help others... After Hurricane Katrina devastated New Orleans, the forum members of SomethingAwful.com got together and accumulated over $30,000 to donate to the Red Cross. Paypal pulled a similar stunt of freezing the account and then gave the owner of the SA account no choice but to refund all of the money (though, fortunately, Paypal did not keep their fees that time). You can read a detailed story about THAT situation here.
Truth be told, I've been pretty irritated with Paypal myself for quite awhile now. I've considered it an unfortunately necessary evil largely due to the incestuous relationship between Paypal and their head honcho, eBay, as well as their very obvious 'deal' with Etsy (funny that Etsy doesn't offer the option to have a Google Checkout [now Google Wallet] payment or Amazon Payments or any of the other dozens of Paypal competitors).
Many, many people closed their Paypal accounts over the last couple of days because they had had enough of the evilness that is Paypal. Unfortunately, I can't be one of them if I want to continue to do business on the internet. Because people are weary of using checkout options they aren't familiar with, or because it takes more effort to pay other ways, or because they don't want to have to re-establish themselves with another online payment processor, I have to use Paypal.
And here we come to the more important part of my post: I hate how much power Paypal has and I want to do something, however small, to try to take some of that power away from them. There is a damn good reason anti-monopoly laws exist and Paypal is a good example of that reason.
So I am setting out to introduce more people to the other options they have available to them. I'm going to start offering various promotions over the next few months for those who use Google Wallet to make their Etsy payment. I encourage other Etsy sellers to do the same.
Friday, December 2, 2011
Buttons, Buttons, Buttons...
 I shouldn't be blogging right now, but I need a bit of a break!
So, today, I bring you a post about something I started pseudo-obsessing over a couple of years ago: BUTTONS! It all started when I needed some buttons for these awesome and easy Mary-Jane-esque crochet slippers. I made several pairs as gifts Christmas 2009 and didn't have any buttons. Which was when I realized how crazy expensive buttons are. Which was when I checked eBay and found the 10+-lb auctions...

I got lucky and a woman nearby on craigslist had 12 pounds of buttons (some of them sorted by size and material!) for sale. Since then, I've still been on the hunt for more buttons. eBay has been a disappointment though... There is NO reason that 2 lbs of buttons should cost $15 to ship, FFS. Those would very likely fit in a USPS Small Flat Rate box which costs $5 to ship (and USPS provides flat rate boxes for free, so I call BS when someone charges more! Bump up your price, not your shipping costs, if you want more $.)
 Getting to the point (can you tell I'm procrastinating? :P ): I found an awesome deal on buttons in bulk online! There's a local small chain of art supply stores called Dick Blick's (www.dickblick.com) here in the L.A. area. I'd forgotten about it for years until I found their chalkboard paint. My grandpa was a very talented artist and LOVED Dick Blick's for his oil pastels, charcoal, canvas, exacto knives, balsa wood, etc. (he was a retired very-very-very highly desired machinist and was amazing with his hands!).
Well, Dick Blick's happens to sell buttons by the pound at $2.99/lb. It's their "always on sale" price. And shipping for 20 lbs (yes, I'm a nutter :P) cost only $8! They're on their way to me now from IL via FedEx Home. All of the photos I've posted in this blog post are customer photos of buttons they received. Lots of variety in size, color and even shape!
If I ever feel the need to buy more bulk buttons (and with nearing 40 lbs, I don't think I will anytime soon, haha), I won't bother looking anywhere else.
Saturday, November 12, 2011
Double Pom Pom Hat
I picked up some Loops & Threads Charisma from Michael's today since it was on sale for $2. I've been wanting to make a new hat as a prop for holiday photos and I wanted to use my pom pom maker for it.... So I made this double pom pom hat.
 |
| Pre-Pom Pom |

 |
| Pardon my strange expressions! |
Double Pom Pom Hat
Yarn: Super Bulky
Hook: 6.5mm/K
Size: Should fit an adult woman (obviously ;P) or a child 4+ (there's some stretch to it!). For adult men, I'd recommend a larger hook or adding 4-6 stitches to each row.
Size: Should fit an adult woman (obviously ;P) or a child 4+ (there's some stretch to it!). For adult men, I'd recommend a larger hook or adding 4-6 stitches to each row.
ch21
Rnd 1: 40 hdc around - 40 sts
Rnd 2 19 hdc, inc, rep - 42 sts
Rnd 3: 20 hdc, inc, rep - 44 sts
Rnds 4-16: hdc around - 44 sts
The pom poms were made with Clover's Large Pom Pom Maker using white Caron One Pound and the Red Charisma from the hat. I just put both strands from the prom pom and put them through the corners of the hat and tied them tightly.
I imagine that using worsted weight, a 5.5mm hook, and doing something like this would likely work as well:
ch34
Rnd 1: 68 hdc around - 68 sts
Rnd 2: 33 hdc, inc, rep - 70 sts
Rnd 3: 34 hdc, inc, rep - 72 sts
Rnds 4-24?: hdc around - 72 sts
Wednesday, November 9, 2011
Nerd Dollz
I don't normally do this, but I found this Etsy shop when I was browsing "Supernatural" things (talk about going down the rabbit hole... It all started because A Dog's Life Animal Rescue posted a Groupon, that charity coincidentally being one that Jared Padalecki endorses [I chose the charity as the one I wanted to donate some of my ebay proceeds to since it seemed cool and I <3 my dog... and then see that there is a random Supernatural connection to it, haha]).
I digress.
I found this shop, NerdDollz, on Etsy. Normally, I see something like this and am a bit "meh" about them, but not only are these dolls seemingly very well made and designed, but they are realistically priced. (I am NOT a fan of overpriced sh!t on Etsy... it, IMO, goes against the community feel). I am very tempted to buy myself an early present of these:


I've seen other amigurumi (though not Sam, Dean & Cas) and am seriously inspired! I'm going to have to see if I can make anything nearly as cool (maybe as gifts, but also maybe just for me). And if & when I am unable to (whether it be skill or time lacking), I'm going to have to pay the awesome Shannon Nix from Shawnee, KS to make me some!
Speaking of fantastic crochet nerd amigurumi, I also wanted to plug PigCorner.com's ami patterns... She, too, has an Ezio that is awesome:
Creative and crafty nerds are so fun!
I digress.
I found this shop, NerdDollz, on Etsy. Normally, I see something like this and am a bit "meh" about them, but not only are these dolls seemingly very well made and designed, but they are realistically priced. (I am NOT a fan of overpriced sh!t on Etsy... it, IMO, goes against the community feel). I am very tempted to buy myself an early present of these:
How awesome are those?! And they're just, like, $70 for all 3.
Also quite fabulous is this:
Yes, that is Ezio Auditore from Assassin's Creed. Cute, right?
Think of a nerdy character and this shop seems to have it! Star Wars, Harry Potter, Kick Ass, Avatar, Shrek... even Twilight. And I'd imagine the seller is open to suggestions as well.
I've seen other amigurumi (though not Sam, Dean & Cas) and am seriously inspired! I'm going to have to see if I can make anything nearly as cool (maybe as gifts, but also maybe just for me). And if & when I am unable to (whether it be skill or time lacking), I'm going to have to pay the awesome Shannon Nix from Shawnee, KS to make me some!
Speaking of fantastic crochet nerd amigurumi, I also wanted to plug PigCorner.com's ami patterns... She, too, has an Ezio that is awesome:
 |
| Pattern and video tutorial found here. |
Friday, November 4, 2011
Castle Crashers Etsy Treasury
To honor craft Castle Crashers fans, I created a treasury.
Check out the awesome-ness here: Castle Crashers Treasury.

Check out the awesome-ness here: Castle Crashers Treasury.
Sunday, October 9, 2011
Holiday Season is Almost Upon Us!
Also, hat season! My busy-ness has only increased for some reason as the year starts to wind down. Weddings, wedding gigs, holiday photoshoots, and hat orders galore. :)
Currently, when not working, I'm working on revamping my Castle Crashers Knight hat. When I first wrote the pattern, I had never made a hat before. I also hadn't written many patterns at that point. And I have made slight modifications almost every time I have made another hat for someone on Etsy... the eyes and "knobs" in particular.
I was also inspired to make some hats of animal orbs from CC, though unfortunately I haven't made any yet as the person who wanted Rammy changed their mind. :( BUT that doesn't mean I won't be coming up with some more patterns for them!
I imagine this post is a bit boring and I apologize for that! I'll blame my busy few months some more and the cold that I'm getting over. ;P
Something else to look forward to: some dog toy patterns and probably a sweater/hoodie or two. I intend to make some things to donate to a local shelter AND I'll have some Italian Greyhounds to design for soon! Our friends are moving back with their dogs who are used to Phoenix winters and will likely enjoy some sweaters! :)
Currently, when not working, I'm working on revamping my Castle Crashers Knight hat. When I first wrote the pattern, I had never made a hat before. I also hadn't written many patterns at that point. And I have made slight modifications almost every time I have made another hat for someone on Etsy... the eyes and "knobs" in particular.
I was also inspired to make some hats of animal orbs from CC, though unfortunately I haven't made any yet as the person who wanted Rammy changed their mind. :( BUT that doesn't mean I won't be coming up with some more patterns for them!
I imagine this post is a bit boring and I apologize for that! I'll blame my busy few months some more and the cold that I'm getting over. ;P
Something else to look forward to: some dog toy patterns and probably a sweater/hoodie or two. I intend to make some things to donate to a local shelter AND I'll have some Italian Greyhounds to design for soon! Our friends are moving back with their dogs who are used to Phoenix winters and will likely enjoy some sweaters! :)
Saturday, August 27, 2011
Star Lights
 |
| Solar Star Lights from plowhearth.com |
I have been trying to find another light source for our living room for awhile now and haven't been having much luck. Right now, we have 4 star paper lanterns up in the corner above the couch (hanging from the ceiling), but the room is pretty good sized and really needs more light than that. We often turn on the light above our stairs (which is on the opposite side from the stars) when we need more light, but that only sort of works.
We also don't have a lot of wall to our living room since the downstairs floor plan is fairly open. Something on the ceiling might be nice, but we have about 6 feet of lower ceiling and then it's a really, really high ceiling for the rest of the room. It would also potentially be costly to do something like recessed lighting, besides the time and effort it would require.
 |
White Organza Star String Lights on Amazon on Amazon |
Continuing my search a bit, I looked on Amazon for some star lights. I found these: White Organza Star String Lights
. Now I like those too! Not for outdoors, obviously, but they're cute for indoors, no? But I can't help but think that I could probably make something like those. They are, after all, just organza on frames covering lights. (Just got an idea to, if I attempt this, make some ornaments like those too 'cause that would be pretty neat!). Maybe use something like pipe cleaners, floral stems or toothpicks for the frame...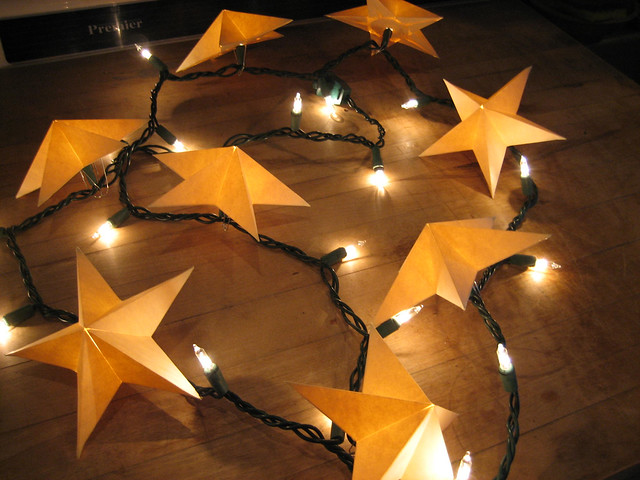 |
| Ben Light's Star Light Minis |
And from that, I went to searching along the lines of "DIY star lights" and came upon This Blog Post (modhomeecteacher at curbly.com) about making star light covers out of manila envelops, which was nabbed from DudeCraft.com, which posted from Makezine.com's article about making paper stars for Christmas ornaments (okay, I imagine that was a bit exhausting to read, but I wanted to give those blogs credit for leading me to the tutorial!).
Ben Light's photoset on Flickr shows photos of a few stages, as well as a template to make your own. Awesome, right? And I figure any paper would likely work, not just manila envelopes. I have quite a lot of different types of paper due to my origami lucky star addiction, including some white vellum. Not only do I think they could be cool for Christmas time, but if they turn out well, they could solve the problem I have in my living room! And, really, for that matter, possibly work outside on the deck as well. Though I would probably try covering them with Mod Podge Outdoor and have them under the awning if I put them outside...
 |
| Template here |
Thursday, August 25, 2011
My first "real" wearable!
I have made my first wearable! (hats, scarves and fingerless gloves don't count :P). I had been wanting to make a baby shrug for awhile now but had been intimidated by the patterns I found. But I wanted to give Kami something handmade for her first birthday (her other gifts being books) and had already made her plenty of hats and an afghan.
So I made the pattern on LionBrand's site for the Flutter Baby Top (ravelry link). It took me about 5.5-6 hours to finish, but was pretty easy to make. I imagine if I was making it for a smaller baby it would have taken 4.5-5 hours instead, but I made the 12-24 mos size (I hope it fits her! You never really know without measuring).
 You work it up in practically one piece, which is really nice. And I will be using that "style" of making shrugs & sweaters as a foundation for others as well! I imagine you can pick any stitch and work it up in the same way and get some fun shrugs.
I've otherwise been working on some granny squares for Share a Square. I didn't make the first deadline, but will probably send the 15 I have out tomorrow anyway since it seems they're short. :(

 |
| LionBrand's Flutter Baby Top |
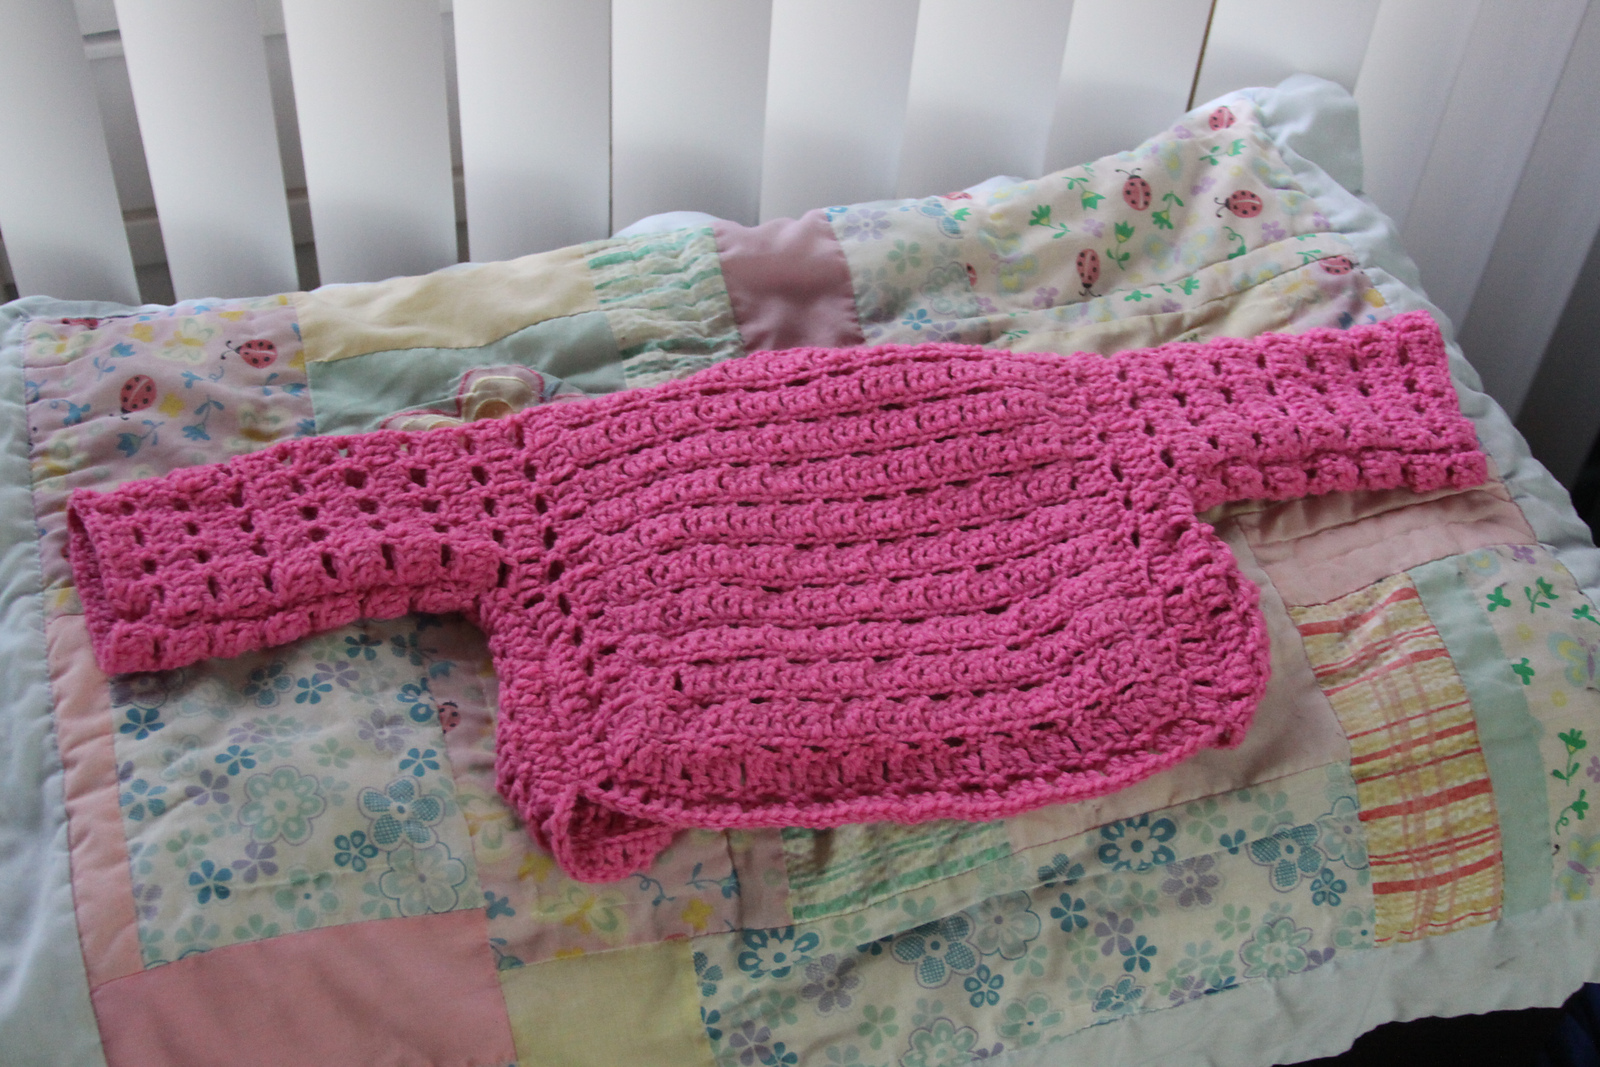 You work it up in practically one piece, which is really nice. And I will be using that "style" of making shrugs & sweaters as a foundation for others as well! I imagine you can pick any stitch and work it up in the same way and get some fun shrugs.
I've otherwise been working on some granny squares for Share a Square. I didn't make the first deadline, but will probably send the 15 I have out tomorrow anyway since it seems they're short. :(
Friday, August 12, 2011
Share a Square
It's been a busy month! (I feel like I've been saying that in nearly every post... But it really has been a busy YEAR for me for some reason!). I just finished up 11 Hello Kitty amigurumi and 5 Keroppis for Kami's birthday party next week, so that's a load off. Plus, I had photos from a wedding I shot last month to go through and edit - another huge load off my shoulders.
Now, I have a Rammy hat to make, a cupcake hat, and an owl hat. And, naturally, I'm busy with all of this when I discover "Share a Square" (Facebook, Ravelry), this fantastic group of crocheters who make hundreds and hundreds of granny squares and give the afghans made from them to children who have cancer. I really, really want to make some squares and send them, but I haven't got the time right now. :( First deadline is 8/26, which I likely won't make, but there is a second deadline 10/26 that I'm hoping to be able to make. It's really awesome to see all of these people working together to do something special for these kids and who doesn't want to be a part of that?
So anybody who crochets, or knows someone who crochets, check out those links and see about sending some granny squares! Every square counts! And not only is it a nice way to do something for someone else, but a great way to use up that Red Heart Super Saver yarn that you have from when you first started to crochet and have since moved on to softer fibers. ;)
I actually found the Share a Square group on Ravelry while looking around at fun granny square patterns. That smiley face one by SmoothFox is pretty cute and seems like it would be simple to make. Find her pattern (for free) on Ravelry here (but remember that SaS squares need to be 6x6 and not 7x7!).
Besides the smiley face, I also really like this Hello Kitty granny square. It's one I imagine a lot of people haven't seen before and would be happy to see in their afghan (or bag or scarf or hat or...).
 And, lastly for today, here's one that I would obviously like: SmoothFox's Star Square. It isn't free, but it's only $2.50, which is a fair price, I think. I definitely intend to crank out a few of those to spread the star love, haha. And I have some Red Heart SS from a friend who gave up crocheting that will work perfectly. :)
Now I wonder if I could come up with some granny square patterns... Maybe something nerdy?
Now, I have a Rammy hat to make, a cupcake hat, and an owl hat. And, naturally, I'm busy with all of this when I discover "Share a Square" (Facebook, Ravelry), this fantastic group of crocheters who make hundreds and hundreds of granny squares and give the afghans made from them to children who have cancer. I really, really want to make some squares and send them, but I haven't got the time right now. :( First deadline is 8/26, which I likely won't make, but there is a second deadline 10/26 that I'm hoping to be able to make. It's really awesome to see all of these people working together to do something special for these kids and who doesn't want to be a part of that?
So anybody who crochets, or knows someone who crochets, check out those links and see about sending some granny squares! Every square counts! And not only is it a nice way to do something for someone else, but a great way to use up that Red Heart Super Saver yarn that you have from when you first started to crochet and have since moved on to softer fibers. ;)
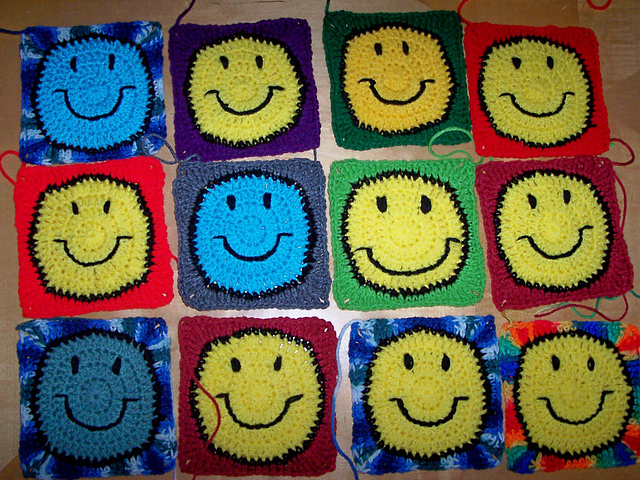 |
| Some fun smiley face granny squares made by crochetdiva on Ravelry. |
I actually found the Share a Square group on Ravelry while looking around at fun granny square patterns. That smiley face one by SmoothFox is pretty cute and seems like it would be simple to make. Find her pattern (for free) on Ravelry here (but remember that SaS squares need to be 6x6 and not 7x7!).
 |
| Made by Petra Kotrysova |
Besides the smiley face, I also really like this Hello Kitty granny square. It's one I imagine a lot of people haven't seen before and would be happy to see in their afghan (or bag or scarf or hat or...).
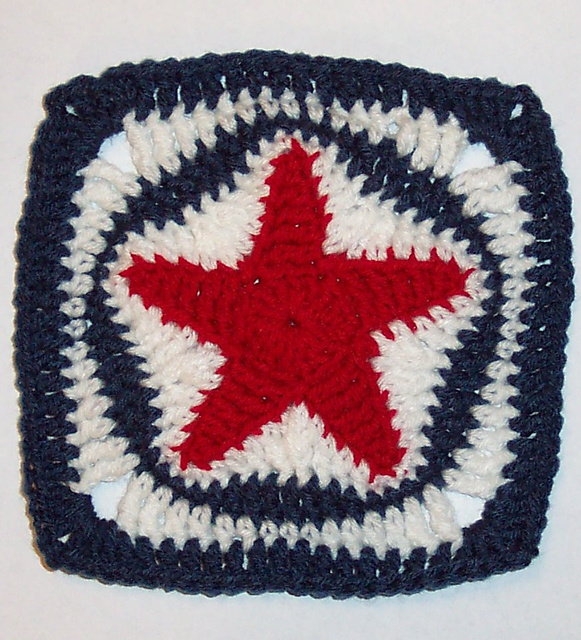 And, lastly for today, here's one that I would obviously like: SmoothFox's Star Square. It isn't free, but it's only $2.50, which is a fair price, I think. I definitely intend to crank out a few of those to spread the star love, haha. And I have some Red Heart SS from a friend who gave up crocheting that will work perfectly. :)
Now I wonder if I could come up with some granny square patterns... Maybe something nerdy?
Sunday, July 3, 2011
A bit of everything...
 |
| Wicket making friends with another small dog at the Simi Dog Park |
I did list some things on ebay, deciding to branch out from just friends/friends of friends & etsy, so there's something.
And I worked on some Monkey hats! I made one intending to give it to my nephew, but then realized he probably already has one and then decided it would be cool to gift to Kami. :) And then I 'had' to make one for Hannah too ('cause, y'know, one cute baby in a monkey hat is great and TWO cute babies in monkey hats is SUPER great!). I also want to make some pacifier plush and intended to send a plush banana with the monkey hat, so I have one of those lying around now, unloved. Will have to do something about that!
 |
| Monkey and Banana (and the banana is a rattle!) |
I have also been working on some designs for other animals because it's really just too fun. Unfortunately, it's not really beanie weather though, as it's now July and 90+ degrees (F). Bah! It's fun coming up with (mostly just drawn out) designs, though. I can't begin to explain just how happy I am that I can not only READ and FOLLOW crochet patterns now, but I can write them too. When I was in my late teens, I was always intimidated by all the abbreviations and terms and didn't even do more than a single crochet stitch and rectangular things. Now, I'm able to visualize what stitches and such work best to create a variety of shapes. :)
Some time has also been spent coming up with baby geekery because I'm really not sure there is ENOUGH baby stuff for the geeks & nerds of the world out there. And that just ain't right.
Oh, that's something else crafty I did this past month! I went through our wedding photos and some other photos and got prints! (it's only been 2 years now...) And I intend to mount some of them on wood and frame the bigger ones (will post how the wood mounting works out!). It was helpful to compare a professional quality 8x10 to a Costco 8x10 too. Costco's are pretty damn good, just FYI. The Bay Photo print looked incredible, but the differences were the type that could 1: be improved by editing just a bit differently and 2: barely discernible without looking for the differences with another photo right beside it. And for the difference in cost (a 20"x30" was $8.99 at Costco... 8"x10" was $1.50 versus $3-4... 4"x6" was $0.13 versus $0.25), I'm not sure how often I'll get the smaller prints anywhere but Costco.
Wednesday, June 8, 2011
New Baby Hat Design - Fox
I have a few designs sketched out for various types of hats and finally had the chance to crochet one. :) I give you, the baby fox:
 This hat is available in my etsy shop and can be made to order. :)
I have also made several more "newsies" hats in a variety of colors and textures. Pattern for this hat is available on Ravelry.


I have also made several more "newsies" hats in a variety of colors and textures. Pattern for this hat is available on Ravelry.


Tuesday, May 24, 2011
Store review, non-acrylic yarn
I think I've mentioned it here before that I wanted to try to experiment with other types of yarn (I generally stick with acrylic and dabble with cotton occasionally). Well, after searching for quite awhile on the internet, I found a site that had a pretty good deal on bamboo yarn (eco-friendly, anti-bacterial, soft - win-win-win!), eKnittingNeedles.com. They have a couple of types of bamboo yarn for $8.99/3 balls or 1 ball for $3.99. The variety of colors is nice, the site's navigation it easy, and they processed and shipped my order pretty quickly. I recommend them if you're looking for an easy to work with vendor!
I have yet to actually work with the yarn as it's always difficult for me to use up something cool that I have (seriously, it's silly, but it's the "But if I use it for X, what if I want to use it for Y instead? I won't have any if I use it!" type of thinking). It is pretty ridiculously soft and silky though and seems to be pretty durable.
And I just ordered some huge cones of cotton yarn off eBay in neutral-ish colors, tobacco, crocodile and pink (which is a very, very pale pink). 8lbs of cotton yarn is coming my way from NC! :) I look forward to making baby hats with them, as well as some other things.
A couple of weeks ago, I broke down and ordered from Joann.com. Ugh. Anyone who has ever ordered from them knows how LONG it takes for them to process even the simplest of orders. But I like their Sensations Rainbow yarns and couldn't get some of the colors in-store. At least I got free (turtle-slow) shipping and didn't have to pay the outrageous fees they charge!
Sorry that this post is a bit boring. Since finishing up the owl hats I needed to finish late last week, it's been a whirlwind of activity over here! I finally got to meet my cutie-pie nephew and hung out with my SIL & her husband a bunch while they were in town, as well as seeing some friends who just recently moved back from out of the country... And I was a crochet fiend Saturday night trying to finish up some play food for my friends' daughter, Emma (cupcakes, fried eggs, a couple more cookies). Naturally, I can't find my 32oz bag of polyfill, which I needed for the cupcakes, so I had to run to Joann and grab another (40% off coupon FTW!).
I have yet to actually work with the yarn as it's always difficult for me to use up something cool that I have (seriously, it's silly, but it's the "But if I use it for X, what if I want to use it for Y instead? I won't have any if I use it!" type of thinking). It is pretty ridiculously soft and silky though and seems to be pretty durable.
And I just ordered some huge cones of cotton yarn off eBay in neutral-ish colors, tobacco, crocodile and pink (which is a very, very pale pink). 8lbs of cotton yarn is coming my way from NC! :) I look forward to making baby hats with them, as well as some other things.
A couple of weeks ago, I broke down and ordered from Joann.com. Ugh. Anyone who has ever ordered from them knows how LONG it takes for them to process even the simplest of orders. But I like their Sensations Rainbow yarns and couldn't get some of the colors in-store. At least I got free (turtle-slow) shipping and didn't have to pay the outrageous fees they charge!
Sorry that this post is a bit boring. Since finishing up the owl hats I needed to finish late last week, it's been a whirlwind of activity over here! I finally got to meet my cutie-pie nephew and hung out with my SIL & her husband a bunch while they were in town, as well as seeing some friends who just recently moved back from out of the country... And I was a crochet fiend Saturday night trying to finish up some play food for my friends' daughter, Emma (cupcakes, fried eggs, a couple more cookies). Naturally, I can't find my 32oz bag of polyfill, which I needed for the cupcakes, so I had to run to Joann and grab another (40% off coupon FTW!).
Thursday, May 19, 2011
PATTERN: Stargazer Lily-esque Flower
Inspired by all the crochet flowers I've seen on Pinterest and wanting to make some flowers for a friend's daughter, I made some stargazer lily-esque flowers. :) I made this first one in purple because it's my friend's favorite color AND because I had both next to me after finishing another friend's purple owl hat.
 Stargazer Lily
Center: 12 sc into magic circle (could also ch2, 12 sc into 2nd ch) Fasten off.
Inside of petals:
Attach yarn to 2nd st of circle, ch10. Fasten off.
Attach yarn to 4th st of circle, ch10. Fasten off.
Continue attaching yarn to every other st of circle, ch10. Fasten off.
Outside of petals:
Attach yarn to first st of magic circle.
2: Sl st into 2nd st (where your inner petal is), tr 3 times into ch, dc 2 times, hdc 3 times, sc into next, sl st into end, sc into next, hdc 3 times, dc 2 times, tr 3 times, sl st into base of petal, sc into magic circle.
Rep 2 for all petals, sl st to join.
I used a 4.5mm hook and worsted weight yarn (Red Heart Super Saver Yellow , Caron One Pound Iris
 , Lion Brand Pound of Love Lavender
 ) and made a flower that is about 5" from petal tip to petal tip.

Center: 12 sc into magic circle (could also ch2, 12 sc into 2nd ch) Fasten off.
Inside of petals:
Attach yarn to 2nd st of circle, ch10. Fasten off.
Attach yarn to 4th st of circle, ch10. Fasten off.
Continue attaching yarn to every other st of circle, ch10. Fasten off.
Outside of petals:
Attach yarn to first st of magic circle.
2: Sl st into 2nd st (where your inner petal is), tr 3 times into ch, dc 2 times, hdc 3 times, sc into next, sl st into end, sc into next, hdc 3 times, dc 2 times, tr 3 times, sl st into base of petal, sc into magic circle.
Rep 2 for all petals, sl st to join.
I used a 4.5mm hook and worsted weight yarn (Red Heart Super Saver Yellow
, Caron One Pound Iris, Lion Brand Pound of Love Lavender) and made a flower that is about 5" from petal tip to petal tip.Sunday, May 15, 2011
Pinterest & Fun and simple Hawaiian Flowers
So after seeing how fun and useful Pinterest appeared when my SIL, Beth (Paired Hearts/The Wondercraft), and Jesyka (Visual Vocabulary) were using it, I requested an invite of my own. 24 hours or so later, I was invited to join. It's a fantastic tool to organize inspiration boards of images! Where was it 2.5+ years ago when I was planning my wedding and had to create folders on my computer to organize images (favors, hairstyles, wedding dresses, etc.)?!

I've been enjoying creating boards and pinning things, like inspiration for crochet projects, design ideas for the house, "No Evil" figurines (I collect them), photos of wolves I like... I sent my husband an invitation to join too, and he's enjoying using it for things like design ideas for painting miniatures (D&D, tanks, etc.), reference photos for work/other projects. All in all, it's pretty darn cool!
And you can follow others' boards when you find people who have (a) board(s) you enjoy.
So, while I was looking in Google images for cool crochet things, I found these Hawaiian Flowers by Sarah London (and her blog, which has been added to the list of blogs I will follow!). She added the pattern in 4 parts as a mystery motif, but I've grabbed each of those and you can find them below.
Note: ***NOT MY PATTERN***
 Written in British/Australian crochet, so double crochet is the American single crochet, etc.
Hawaiian Flowers by Sarah London
Chain 1, work 12 double crochet into ring, join with a slip stitch into first double crochet.
Fasten off.
Join a new colour into any double crochet, chain 1, work 1 double crochet into the same stitch, * work 1 double crochet into the next stitch, chain 11, 1 double crochet into the same stitch, work 1 double crochet into the next stitch, chain 1, 1 double crochet into the next stitch, repeat from * around, omitting last 1 double crochet into the next stitch and join with a slip stitch into the first double crochet.
Join a new colour into any double crochet, chain 1, work 1 double crochet into the same stitch, * work 1 double crochet into the next stitch, chain 11, 1 double crochet into the same stitch, work 1 double crochet into the next stitch, chain 1, 1 double crochet into the next stitch, repeat from * around, omitting last 1 double crochet into the next stitch and join with a slip stitch into the first double crochet.
Work a round of double crochet in a contrasting colour as such:
Work 9 double crochet up one side of the petal, chain 3, work 9 double crochet down the other side of the petal, work 1 double crochet into chain 1 space of round two, continue around, join with a slip stitch to end.
Fasten off.
I've been enjoying creating boards and pinning things, like inspiration for crochet projects, design ideas for the house, "No Evil" figurines (I collect them), photos of wolves I like... I sent my husband an invitation to join too, and he's enjoying using it for things like design ideas for painting miniatures (D&D, tanks, etc.), reference photos for work/other projects. All in all, it's pretty darn cool!
And you can follow others' boards when you find people who have (a) board(s) you enjoy.
So, while I was looking in Google images for cool crochet things, I found these Hawaiian Flowers by Sarah London (and her blog, which has been added to the list of blogs I will follow!). She added the pattern in 4 parts as a mystery motif, but I've grabbed each of those and you can find them below.
Note: ***NOT MY PATTERN***

Hawaiian Flowers by Sarah London
Chain 1, work 12 double crochet into ring, join with a slip stitch into first double crochet.
Fasten off.
Join a new colour into any double crochet, chain 1, work 1 double crochet into the same stitch, * work 1 double crochet into the next stitch, chain 11, 1 double crochet into the same stitch, work 1 double crochet into the next stitch, chain 1, 1 double crochet into the next stitch, repeat from * around, omitting last 1 double crochet into the next stitch and join with a slip stitch into the first double crochet.
Join a new colour into any double crochet, chain 1, work 1 double crochet into the same stitch, * work 1 double crochet into the next stitch, chain 11, 1 double crochet into the same stitch, work 1 double crochet into the next stitch, chain 1, 1 double crochet into the next stitch, repeat from * around, omitting last 1 double crochet into the next stitch and join with a slip stitch into the first double crochet.
Work a round of double crochet in a contrasting colour as such:
Work 9 double crochet up one side of the petal, chain 3, work 9 double crochet down the other side of the petal, work 1 double crochet into chain 1 space of round two, continue around, join with a slip stitch to end.
Fasten off.
Wednesday, May 11, 2011
Softening Acrylic Yarn... Can It Be Done?
Now, before I begin, I should say that I generally steer clear of acrylic yarn that is scratchy or otherwise unpleasant for my projects, even amigurumi. However, there are those times when you need a particular color that just can't be found in any other type than Red Heart Super Saver (for less than $way-too-much).
I've looked before and seen things like "run it through the washer/dryer with fabric softener" and "it can't be done!". I've tried the fabric softener trick and it made my project smell like fabric softener (bah) and didn't necessarily soften it much. Recently, I have encountered the suggestion of using shampoo and/or conditioner.
Fortunately, I found some Red Heart Super Saver that was soft enough (it does depend on the colorway and lot for some reason), but I intend to try some of the scratchy stuff I've received from friends & eBay lots and see how well it works!
UPDATE: I hand-washed a skein and a swatch of Red Heart Super Saver yarn in white with shampoo (Suave Tea Therapy or some such... cheap stuff I happened to have and not use) and conditioner (Herbal Essences Hello Hydration Moisturizing Conditioner 23 fl oz (700 ml) ). The end result was significantly softer yarn. I'm definitely not saying it rivaled some of the softer yarn I've bought, but it did get rid of most of the crunchiness. The annoying part was drying it though. I ran it on medium heat in my dryer for about 45 minutes and it was still quite moist. Air drying is the way to go, I think.
I've looked before and seen things like "run it through the washer/dryer with fabric softener" and "it can't be done!". I've tried the fabric softener trick and it made my project smell like fabric softener (bah) and didn't necessarily soften it much. Recently, I have encountered the suggestion of using shampoo and/or conditioner.
Fortunately, I found some Red Heart Super Saver that was soft enough (it does depend on the colorway and lot for some reason), but I intend to try some of the scratchy stuff I've received from friends & eBay lots and see how well it works!
UPDATE: I hand-washed a skein and a swatch of Red Heart Super Saver yarn in white with shampoo (Suave Tea Therapy or some such... cheap stuff I happened to have and not use) and conditioner (Herbal Essences Hello Hydration Moisturizing Conditioner 23 fl oz (700 ml)
). The end result was significantly softer yarn. I'm definitely not saying it rivaled some of the softer yarn I've bought, but it did get rid of most of the crunchiness. The annoying part was drying it though. I ran it on medium heat in my dryer for about 45 minutes and it was still quite moist. Air drying is the way to go, I think.
Subscribe to:
Posts (Atom)