Sunday, February 28, 2010

PATTERN: Toast Play Food or Dog Toy


My husband & I drove to Phoenix the first week of January 2010 to visit our friends Jason and Beth and I crocheted during the 6-7 hour drive and a bit while visiting. Their dog, Raiden, kept grabbing my balls of yarn, so I decided to use the toast I was making into a toy for him.

For a dog toy, I would highly recommend sewing the rounded tops of the toast together more so that there aren't loose spaces between the triple crochets (Raiden pulled those apart pretty quickly, proving them to be definite vulnerabilities!). I used 4 pieces of toast for this toy and crocheted them together.

For play food, I think it would be fine to only use 2 pieces of toast with stuffing in between. Reinforcement isn't as necessary.


I used worsted weight yarn and a 5.5mm hook.

Toast: (make two or four)
ch16
Row 1: starting in 2nd st, sc 15 - 16 sts
Row 2-8: ch2, dc 16 - 16 sts
Row 9: ch1, 7 tr in 4th st, sl st in 6th st, sc 2, 7 tr in 4th st from end, sl st & fasten off

For play food, sc border in a darker brown on both.
For dog toy, sc border in a darker brown on two of four.

Butter: With yellow, ch6
Row 2-4: sc 5 across
Row 5: sc 5 across, Fasten off.

Assembly: For dog toy, reinforce tr. Sew butter patch(es) to desired pieces. Sc together all 4 pieces of toast with dark brown. Add jingle bell or two in between middle pieces if desired.
For play food, sew butter patch(es) to desired pieces. sc together with dark brown, stuffing before the final stitches.

Saturday, February 27, 2010

PATTERNS: Play Food!

It's been a busy couple of weeks with hats and photos! But I fortunately finished up my most recent order on Thursday and had enough time to make some crochet play food for my friends' daughter for her 4th birthday.

I do not have photos (sadly) of any of my handiwork this time since I wanted to spend my time making food for her instead of documenting. I made her:
- A banana and corn (with faces, using THIS fantastic pattern!)
- A giant chocolate chip cookie (I winged this one: start with 6sc into a magic circle and increase until it's the size you want. Make two of those, embroider "chips", then stuff and sc together)

- A set of duos and "oreo" sandwich cookies:
I basically did 3 layers - cookie, cream filling, cookie - all the same and sewed them together.

Rnd 1: 12sc into magic/adjustable ring (12 sts)
Rnd 2: 2sc into each st (24 sts)
Rnd 3: Sc through both loops all around. Fasten off. (24 sts).
Sew cookies with “wrong” side out so that you get the texture.

While I feared they may be too flat, I think that making the filling the same size as the cookies helped keep it from disappearing (I’m not sure if others do it that way as well as I didn’t really look around much).


- A cupcake (using THIS pattern, modifying it only slightly by combining the first 2 rnds into: 12 dc into a magic ring for both the cake and the frosting.
- A piece of cake (using THIS pattern with white cake/pink frosting/"raspberry" filling and a flower as decor)

- And three strawberries ("body"/red part of strawberry uses THIS pattern, but I made up my own stem & leaves:
My leaves & stem:
Rnd 1: ch2, 6sc into 2nd chain from hook, do not join (6 sts)
Rnd 2: 2sc into each st, do not join (12 sts)
Rnd 3: ch4, sl st into same st, sl st into next st, ch3, sl st into same st, rep from with all sts. Fasten off.
Stem: Join yarn to a st in the center of the leaves ON THE “WRONG” SIDE (one of your sc from rnd 1), ch 5, sc back 4, sl st into another st in center of leaves, fasten off. Pull stem through center of leaves.

My stem and leaves need to be sewn to the top of the strawberry and means skipped rnds 7-9 of the Easy Peasy pattern.


They were well received! :) I'll likely make some more and post photos of my handiwork eventually. :)

Saturday, February 20, 2010

Working on another CC hat, then another, then an elephant and potentially an amigurumi penis (hey, I have a sense of humor and consider no request ridiculous, haha). I have also added "safety eyes" to my supplies (thanks to Harvey's Hobby Hut and their bulk deals), finally having broken down and decided to try them out. :)

Tuesday, February 9, 2010

And the custom kindle cover... :)


I got a request on etsy for a custom cover/sleeve with purple and pink flowers instead of normal round buttons. I think it came out pretty well!

Get your own custom kindle/nook sleeve at my etsy store: crazystars.etsy.com

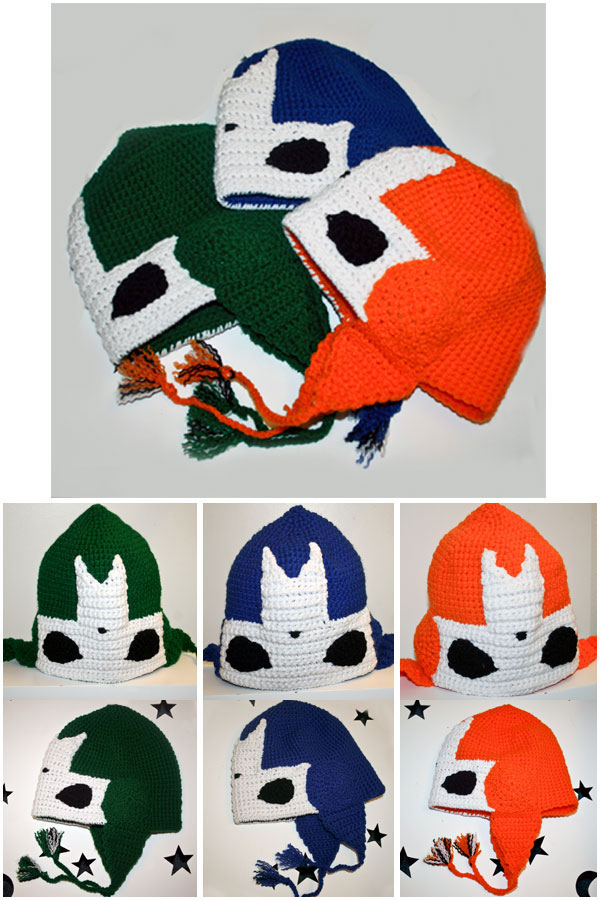
More Castle Crashers Hats!


So I got a few more requests for Castle Crashers hats! I didn't get to snap a photo of the beanie I made (no ear flaps or tassels), but it's recipient was happy with it, so that's more than an enough for me. :)

These hats were made for someone in a forum who requested them. It took me 4 days to make these 3, the beanie and a kindle cover, but I did it! I was a bit of a factory this weekend! :D

Get your own custom Castle Crashers hat from my shop: CrazyStars Handmade